Viewport windows
The viewport windows of OVITO show different views of the three-dimensional scene. You can switch between the default two-by-two grid layout and a single viewport that fills the entire main window. The caption in the upper left corner of each viewport and the axis tripod in the lower left corner indicate the orientation of the virtual camera.
Camera navigation

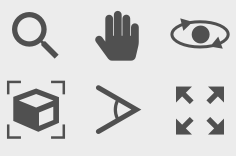
Use the mouse to rotate or move the virtual camera of a viewport:
Left-click and drag to rotate the camera around the current orbit center, which is located in the center of the simulation model by default.
Right-click and drag the mouse in order to move the camera parallel to the projection plane. You can also use the middle mouse button or Shift + left mouse button for this.
Use the mouse wheel to zoom in or out.
Double-click an object to reposition the orbit center to the point under the mouse cursor. From now on the camera will rotate around that new location marked with a three-dimensional cross.
Double-click in an empty region of a viewport to reset the orbit center to the center of the simulation model.
Note that the z-axis is considered the “up” (vertical) direction, and OVITO constrains the camera orientation such that this axis always points upward in the viewports. You turn this behavior off in the viewport context menu or change the constraint axis in the application settings of OVITO.
Viewport toolbar
The viewport toolbar is located below the viewports and provides buttons for explicitly activating various navigation input modes. In addition, you can find two other useful functions here:
The Zoom Scene Extents button automatically adjusts the virtual camera of the active viewport such that all objects in the scene become fully visible. Use the Ctrl key (Command key on macOS) to do it for all viewports at once.
The Maximize Active Viewport button enlarges the active viewport to fill the entire main window. Click the button a second time to restore the original 2-by-2 viewport layout.
Viewport menu

Click the caption label in the upper left corner of a viewport (e.g. Perspective, Top, etc.) to open the viewport menu as shown in the screenshot.
The View Type menu lets you switch to one of the standard viewing orientations and between parallel (orthogonal) and perspective projection types. The Adjust View function gives you precise control over the position and orientation of the viewport’s camera using numeric input fields.
The Preview Mode option activates a virtual frame that is displayed in the viewport to indicate the region that will be visible in rendered images. The aspect ratio of the frame reflects the image size currently set in the Render settings panel. With preview mode active, scene objects and any viewport layers will be rendered in the interactive viewport window just like they are in the final output image.
Use the Create Camera function to insert a camera object into the three-dimensional scene. This object will be linked to the viewport, and moving the camera object around automatically updates the viewport accordingly. This gives you the possibility to animate the camera.